How to Treat Shoulder Pain with an Exercise Band

Proper rotator cuff and scapular muscle strength is critical to treating shoulder pain.  In this video, I demonstrate one of my favorite rotator cuff strengthening exercises by using an exercise band.  It works both the lower trapezius and rotator cuff.

The rotator cuff is a critical component to shoulder mobility.  It’s made up of four different muscles whose job is to make sure that the ball of the humerus (arm bone) rotates, slides, and glides properly in the socket, which is made up of the scapula.  The rotator cuff allows the other major muscles of the arm, such as the deltoid and Latissimus dorsi (lats), to properly perform their movements.

When there is weakness or dysfunction, it will cause rubbing of the muscle tendon on the bone–leading to impingement or eventually fraying and tearing.  With proper muscle strength and balance you can help reduce the risk of this occurring.

Shoulder impingement or a partial rotator cuff tear can be very painful and may take many weeks to recover.  Many different causative factors can lead to these conditions.  In most cases, shoulder impingement (or even small partial tears) can be completely rehabilitated and should (when treated properly) leave no residual effects once a person has recovered.  For more information on how to address shoulder impingement, please refer to How Should I Treat Shoulder Pain and Impingement?

In addition to proper rotator cuff strength, it’s important to address adequate shoulder and thoracic (upper back) mobility.  Be sure to check out My Top 8 Stretches to Eliminate Neck, Upper Back, and Shoulder Pain.  By subscribing to my e-mail list, you will automatically gain access to this FREE resource.  Download the .pdf file, which is full of photos and exercise instructions, to get started!

Shoulder pain can be debilitating by limiting your ability to exercise and perform daily tasks.  Be proactive in your care and management.  If you continue to experience pain, seek additional help.  Don’t let the pain linger.  The longer a condition is left untreated, the more potential for harm and damage which potentially could lead to a longer recovery.  The American Physical Therapy Association (APTA) is an excellent resource for learning more about physical therapy as well as locating a physical therapist in your area.

Which treatments have you found to be the most effective in dealing with shoulder pain?  Additional discussion can help others to manage his/her pain.  Please leave your comments below.

If you have a question that you would like featured in an upcoming blog post, please comment below or submit your question to contact@thePhysicalTherapyAdvisor.com. Be sure to join our growing community on Facebook by liking The Physical Therapy Advisor!

How to Use an Exercise Ball to Improve Posture and Treat Shoulder, Neck, and Back Pain

In this video, I demonstrate how to perform I’s, T’s, and Y’s exercises on an exercise ball in order to address lower and mid trapezius and scapula muscle weakness.  Poor posture (due to poor thoracic mobility) and poor scapular muscle strength are often major contributors to neck, shoulder, and upper back pain.

I’s, T’s, and Y’s exercises on an exercise ball can be helpful in treating the following:

  • Poor posture
  • Shoulder pain
  • Cervical pain
  • Headaches
  • Thoracic pain
  • Upper and lower back pain

Begin by performing these I’s, T’s, and Y’s exercises on a Thera-Band Exercise Ball.  Start slowly without resistance.  Keep your chin tucked and head aligned with the body.  Move your arms slowly up and down in each position of I, T, and Y.

For an advanced version, add a 1-2 pound weight in each hand.  To make it even more challenging, hold for time.  These exercises shouldn’t cause any pain in your neck, shoulder, or upper/lower back.

When this exercise is performed correctly, it engages and strengthens many critical muscles that help control many of our most common postures and movement patterns.  A slouched posture with a forward head and rounded shoulders can be associated with many common pain syndromes including: headaches; cervical pain, upper back pain; and shoulder pain.

It’s important to try to keep the proper postural alignment with your shoulders under your ears, and the shoulder blades set in a back and down position.  This is particularly important when performing any activity while using the shoulder.  This series of exercises can help to strengthen the important muscles that can help you maintain proper postural alignment.

In addition to muscle weakness leading to common aches and pains, poor mobility in the thoracic spine is also a common contributing factor in the pain syndromes mentioned above.  If you want to learn how to stretch and self-mobilize the thoracic spine, be sure to check out My Top 8 Stretches to Eliminate Neck, Upper Back, and Shoulder Pain.  By subscribing to my e-mail list, you will automatically gain access to this FREE resource.  Download the .pdf file, which is full of photos and exercise instructions, to get started!

If you continue to experience pain, seek additional help.  Don’t let the pain linger.  The longer a condition is left untreated, the more potential for harm and damage which potentially could lead to a longer recovery.  The American Physical Therapy Association (APTA) is an excellent resource for learning more about physical therapy as well as locating a physical therapist in your area.

Do you have a favorite “go to exercise” that you use to treat neck, shoulder, and upper back pain?  Please leave your comments below.

If you have a question that you would like featured in an upcoming blog post, please comment below or submit your question to contact@thePhysicalTherapyAdvisor.com. Be sure to join our growing community on Facebook by liking The Physical Therapy Advisor!
How to Use the Clamshell Hip Exercise to Treat Knee Pain

Knee pain is the most common running related injury.  There are many different causes of knee pain including: Patellar Femoral Pain Syndrome (PFPS); Iliotibial Band pain (IT Band); Patellar Tendinitis; and meniscus injuries.

The root cause of many of the most common knee related issues is hip weakness.  The hip abductors and hip external (lateral) rotators are very important for knee control and stability.  When weakness is present in these groups of muscles, pain is often felt down the kinetic chain (particularly, in the knee).

One of the best ways to treat many common running aches and pains is to focus on strengthening these muscles which include the gluteus medius, the tensor fascia latae, and the other deep hip rotators.

In this video, I demonstrate how to perform the clamshell exercise.  It’s an excellent non-weight bearing exercise to work on hip rotator strength which will directly affect knee stability.  In the video, I use a red exercise band.  As you progress, you could transition to a thicker band to increase the resistance and difficulty of the exercise.

Looking for more comprehensive information on how to self-treat and prevent the most common running related injuries?  I have teamed up with Angie Spencer (RN and Certified Running Coach) and Trevor Spencer (co-host of the Marathon Training Academy Podcast) to give you the tools to become a Resilient Runner.

In the Resilient Runner program, we explain injury prevention strategies to keep you running.  We provide detailed videos and rehabilitation guides on how to effectively SELF-TREAT each problem area of the body including:

  • Lower Back Pain and Piriformis
  • Hip: Hip Bursitis and Hip Flexor Pain
  • Upper Leg: Iliotibial Band and Hamstring Injury
  • Knee Pain: Patellar Femoral Pain Syndrome (Runner’s Knee); Patellar Tendinitis; and Meniscus Injury
  • Lower Leg and Foot: Achilles Tendinitis; Plantar Fasciitis; Posterior Tibial Tendon Dysfunction; Shin Splints; and Stress Fractures

The Resilient Runner program is designed to help YOU meet YOUR training goals by insuring you have the tools to avoid injury, recover quickly, and train at a peak level.

It’s a virtual library of self-treatment protocols including downloadable podcasts, videos, and .pdf files of rehabilitation guides.  It also includes a 320 page eBook, The Resilient Runner, Prevention and Self-Treatment Guide to Common Running Related Injuries.


Not all of us are born bullet proof, but we can all learn how to be more resilient!

I WANT TO BE RESILIENT!

How to Self-Treat IT Band Pain with a Mini Plunger

Pain in the lateral (outside) leg or knee is commonly associated with a condition known as Iliotibial Band Syndrome (ITBS).  (Iliotibial Band Syndrome is also known as IT Band Syndrome, ITB Syndrome, or IT Band Friction Syndrome.)  Pain can range from the lateral side of the leg up toward the hip area to just below the lateral side of the knee joint (where the head of the fibula bone begins).  The pain can be very debilitating to the point that running or hiking activities have to be stopped.  Even walking can be difficult.

Although ITBS can be very painful, it can be easily self-treated if you handle your pain and symptoms quickly.  For many years, I have taught people how to use a mini plunger as a method to provide a suction force for self-treatment.  In this video, I demonstrate how to utilize a mini plunger as a “cupping” technique to self-treat IT Band Syndrome.

Cupping is a method or technique to massage and mobilize tissues such as muscles, skin, fascia, and tendons.  The exact treatment effect is unclear, but presently the research indicates that it helps to reset neural pain receptors and stretch receptors.  Thus, reducing pain and allowing for improved movement.

Cupping has been around as a treatment technique for thousands of years.  The research on cupping is interesting and for the most part, concludes that cupping is helpful in pain management.  There are some indications that the “suction” may lead to improved blood flow to an injured area which could speed up healing times.  Other health claims of the benefits of cupping haven’t been adequately proven in current research.

Traditionally, cupping has been performed with glass cups by using a flammable paper to quickly “burn” the oxygen in the cup which causes a suction force.  There are now many types of plastic or silicon cups that can easily be purchased online.  CupEDGE Massage Tools are what I use and recommend.  Fancy cups are not necessary.  The cups can be more convenient, but even a small sink plunger will do.

Have you tried cupping to treat ITBS?  If so, what was your experience like?  Additional discussion can help others to manage this condition more effectively.  Please leave your comments below.

For more information on how to self-treat ITBS, please refer to the following:

Looking for that exercise or book I mentioned in a post?  Forgot the name of a product or supplement that you’re interested in?  It’s all listed in the Resource Guide.  Check it out today!

If you have a question that you would like featured in an upcoming blog post, please comment below or submit your question to contact@thePhysicalTherapyAdvisor.com.  Be sure to join our growing community on Facebook by liking The Physical Therapy Advisor!
A Barbell Knee Stability Exercise for Runners

Patellar Femoral Pain Syndrome (PFPS) is the physical therapy term for runner’s knee, a common condition experienced by runners.  It accounts for roughly 25% of all reported cases of knee pain.  PFPS is a term used to describe pain in many areas of the knee including:  pain near the insertion point of the patellar tendon, just below the patella or knee cap; pain just above the knee cap where the quadriceps muscle is blending in and forming the quadriceps/patellar tendon; and/or pain underneath the patella.

Although there are many types of knee pain, many of the potential causative factors for PFPS are similar to other conditions such as IT Band Syndrome (ITBS) and Patellar Tendinitis.  Treatments for knee pain can vary wildly from person to person.  It can be quite painful and significantly affect a person’s ability to run or move properly.  In the case of PFPS, the cause of the pain is often associated with a patellar or knee cap that is tracking in the femoral groove improperly.

Common Causes and Risk Factors for Knee Pain and specifically, Patellar Femoral Pain Syndrome (PFPS) include:

  • Poor quadriceps strength (particularly the inner/medial quadriceps).
  • Poor hip abductor and/or hip external rotator strength.
  • Improper foot biomechanics during the single leg stance phase of the gait cycle or the mid foot strike during running.

One of the primary treatments for nearly all types of knee pain (including PFPS, Patellar Tendinitis, ITBS, and meniscus injury) is to improve your quadriceps and hip strength.  Quadriceps strength is an important component to your long term management and recovery.  As part of the quadriceps strengthening protocol, I have found it useful to skew toward the inner quad, known as the vastus medialis oblique (VMO).  Although you cannot specifically isolate the VMO, I still recommend implementing exercises that are likely to activate the muscle more when performed correctly.

The other critical factor is weak hip abduction and hip external (lateral) rotation muscles, which significantly contribute to PFPS.  The purpose of the lateral and external rotators of the hip is to prevent internal rotation (rolling in) of the hip and knee.  They also provide the stability for the pelvis and lower leg when in single leg stance.  The hip muscles are critical in controlling knee stability and ultimately, patellar (knee cap) tracking.  Adequate strength of the rotators and abductors of the hip is critical.

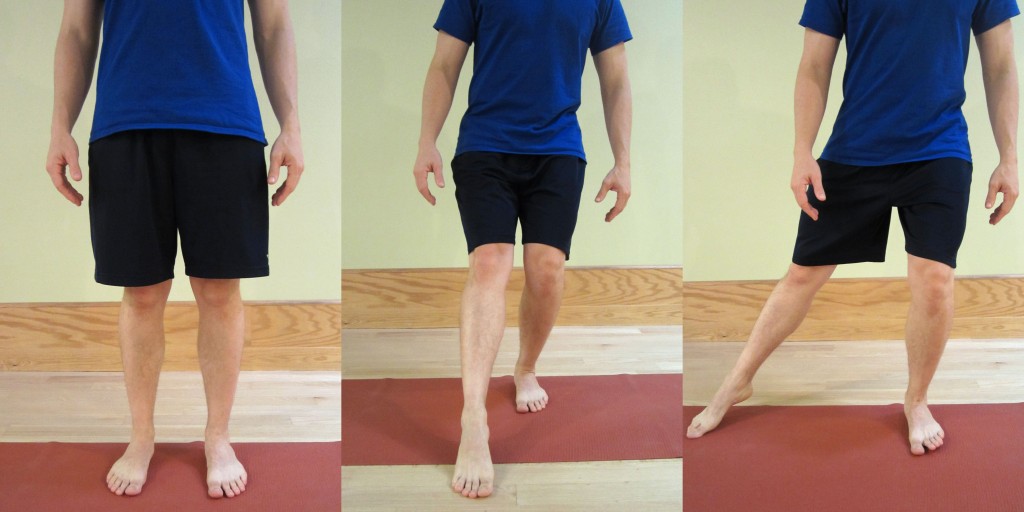
In this video, I demonstrate how to perform an advanced exercise known as the clock or star drill.  It’s an excellent exercise to work on knee stability and balance while specifically focusing on quadriceps and hip strength.  Although I demonstrate the exercise with a barbell in the video, I recommend that you initially be perform it without weight (as demonstrated below).  As you progress, then you could add weight.

ClockExercise

Have you performed the clock or star drill before?  If so, what was your experience like?  Please leave your comments below.

For more information on how to self-treat differing types of knee pain, please refer to the following:

Looking for that exercise or book I mentioned in a post?  Forgot the name of a product or supplement that you’re interested in?  It’s all listed in the Resource Guide.  Check it out today!

If you have a question that you would like featured in an upcoming blog post, please comment below or submit your question to contact@thePhysicalTherapyAdvisor.com.  Be sure to join our growing community on Facebook by liking The Physical Therapy Advisor!
How to Self-Treat Patellar Tendon Pain with a Mobility Band

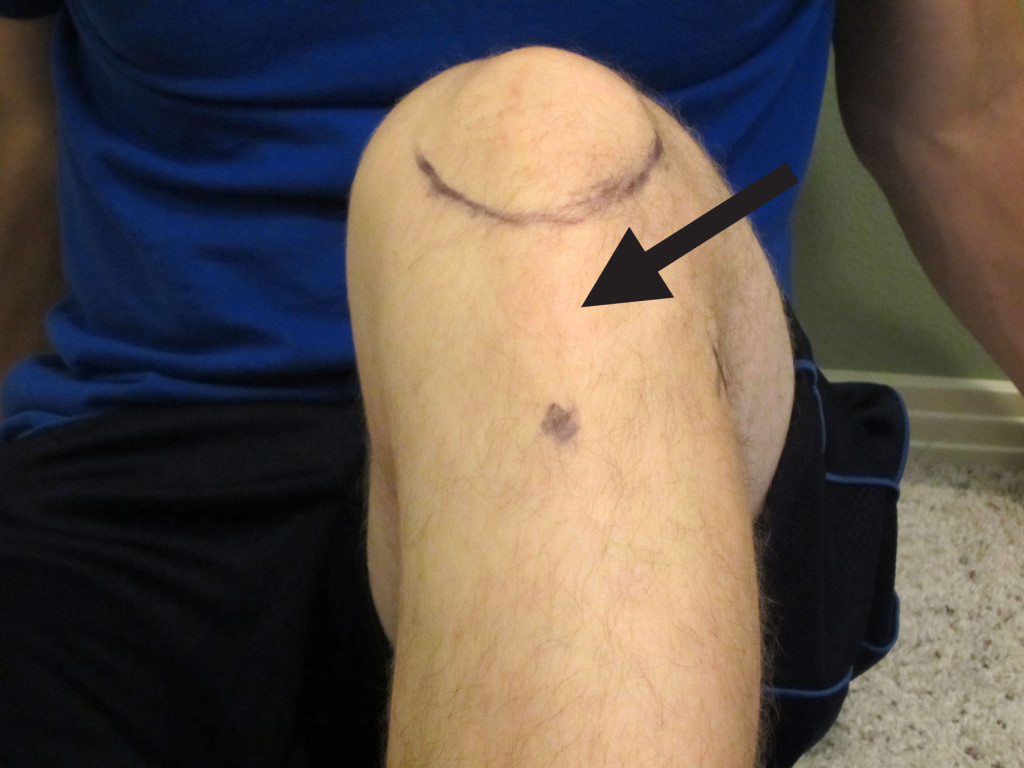
Patellar tendon pain (often called patellar tendinitis or patellar tendinosis) occurs when the tendon connecting your knee cap (patella) to your shinbone becomes inflamed and irritated. Patellar tendinitis is often called “jumper’s knee” because it occurs so frequently in sports like basketball and volleyball.  It also affects runners due to poor lower extremity biomechanics during running.

Patellar Tendinitis symptoms include:

  • Pain directly over the patellar tendon.
  • The tendon is usually tender and swollen.
  • Knee motion can cause “crepitus” (when you hear and feel a crunching or grinding sensation). This may or may not be painful. It’s usually felt under the tendon or the lowest part of the knee cap.
  • Pain with jumping.
  • Pain with kneeling.
  • Pain when walking downstairs.

PatellarTendonPain

The initial course of treatment should include RICE, which stands for Rest, Ice, Compression, and Elevation.

  • Rest. In this case, rest would indicate tapering down from your regular exercise activity and discontinuing running (for the short term).
  • Ice. Apply ice to the painful area. The rule for icing is to apply ice no more than twenty minutes per hour. Do not place the ice directly against the skin, especially if you are using a gel pack style. A bag of frozen peas can be ideal. Individuals with poor circulation or impaired sensation should take particular care when icing.
  • Compression helps to prevent and decrease swelling. Swelling can cause increased pain and slow the healing response, so limit it as much as possible.
  • Elevation. Depending on your pain level and the amount of swelling present, this step may be more or less beneficial.

In this video, I demonstrate how to utilize a mobility/compression band as a self-treatment method for patellar tendinitis. Mobility/compression bands, such as the Rogue Fitness VooDoo X Bands or EDGE Mobility Bands, are a novel way to self-mobilize tissue either of the quadriceps or the patellar tendon. The use of a mobility band not only helps to mobilize the tissue, but it affects blood flow to the area and speeds up healing.  A mobility band also helps to reset some of the receptor cells in the muscle tissue which cause excessive muscle tightness.

As demonstrated in the video, start by applying the mobility band just below the tibial tuberosity, and then over the patellar tendon to the base of the patella. Next, perform the seated knee extension and then the squats.  Typically, the mobility band will only be in place for one to two minutes.  If you experience numbness or tingling, please discontinue the treatment.  (If you suffer from any form of blood clotting disorder or are on blood thinning medications, I would advise against utilizing mobility bands for any type of deep compression.)

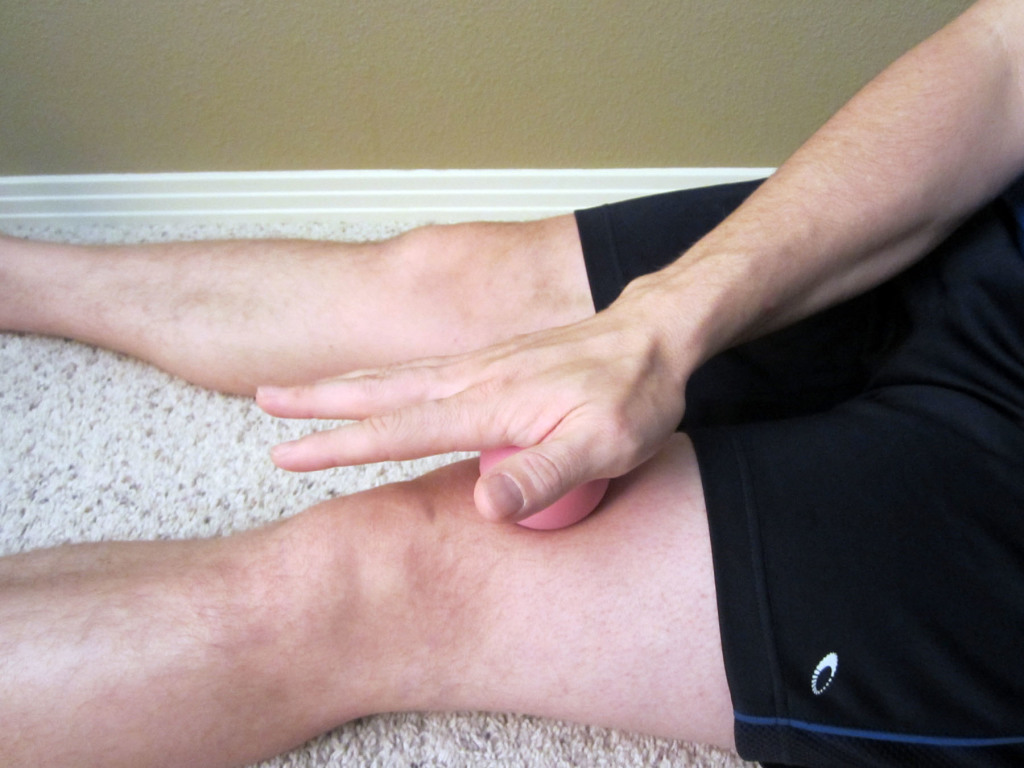
In addition to utilizing the mobility band, I often find that it’s critical to improve general tissue mobility. I recommend stretching and mobilizing the tissues of the lower legs.  Myofascial release of the quadriceps muscle is an important component in order to relieve the pain while reducing the pressure and tension through the patellar femoral tendon and joint.  This is typically a very effective and important step as most will find pain relief from improving quadriceps mobility.  I tend to utilize the foam roller for the larger part of the quadriceps.

LacrosseBallForQuad

I also use a tennis or lacrosse ball to aggressively work the tissue above the patella. You can use your hand to press the ball in and work it around the tissue.  To use the weight of your leg for a more aggressive mobilization, place the ball on the ground and mobilize the tissue with your leg on top of the ball.

For additional helpful tips and tricks on treating knee pain, please refer to my guest post for the Marathon Training Academy, How to Self-Treat Runner’s Knee.  Much of the advice and training recommendations are also relevant to treating patellar tendinitis.

Have you tried using a mobility band before to treat patellar tendinitis? If so, what was your experience like?  Please leave your comments below.

Looking for that exercise or book I mentioned in a post?  Forgot the name of a product or supplement that you’re interested in?  It’s all listed in the Resource Guide.  Check it out today!

If you have a question that you would like featured in an upcoming blog post, please comment below or submit your question to contact@thePhysicalTherapyAdvisor.com.  Be sure to join our growing community on Facebook by liking The Physical Therapy Advisor!
How to Self-Treat IT Band Syndrome with a Mobility Band

Pain in the lateral (outside) leg or knee is commonly associated with a condition known as Iliotibial Band Syndrome (ITBS). (Iliotibial Band Syndrome is also known as IT Band Syndrome, ITB Syndrome, or IT Band Friction Syndrome.) Pain can range from the lateral side of the leg up toward the hip area to just below the lateral side of the knee joint (where the head of the fibula bone begins).

The IT Band is a very thick fibrous band of tissue that spans from the hip’s origin point at a muscle known as the Tensor fasciae latae (TFL). The TFL transitions into the IT band and progresses down the lateral thigh and ends at the head of the fibula.  The IT Band’s primary function is to provide additional lateral support for the knee joint (particularly when standing or landing on one leg).

IT Band Syndrome is often associated with an over use injury. Runners will often develop ITBS after running on uneven terrain or downhill.  Gait or running abnormalities can increase your risk of developing ITBS.  Although it can be very painful, it can be easily self-treated if you handle your pain and symptoms quickly.

A simple and effective method to self-treat ITBS is through the use of a mobility/compression band (such as an EDGE Mobility Band). In this video, I demonstrate how to use a mobility/compression band to mobilize the iliotibial band (also known as the IT Band) as a self-treatment method for ITBS.

Have you tried using a mobility band before to treat ITBS? If so, what was your experience like?  Additional discussion can help others to manage this condition more effectively.  Please leave your comments below.

For more information on how to self-treat ITBS, please refer to the following:

Looking for that exercise or book I mentioned in a post?  Forgot the name of a product or supplement that you’re interested in?  It’s all listed in the Resource Guide. Check it out today!

If you have a question that you would like featured in an upcoming blog post, please comment below or submit your question to contact@thePhysicalTherapyAdvisor.com. Be sure to join our growing community on Facebook by liking The Physical Therapy Advisor!
How to use a Foam Roller

This video on the basics of foam rolling was recorded during a seminar for CrossFitters. The seminar focused on how to use the foam roller in order to help prevent shoulder, upper back, and neck pain.

The foam roller is a wonderful tool which allows you as an independent user to manipulate the body’s soft tissues which has a potential positive effect on the fascial system, the musculotendinous system, and the circulatory system. (Individuals taking blood thinning medications or with blood clotting disorders should consult his/her physician prior to using a foam roller for mobilization.)

Possible reasons to utilize the foam roller include:

  • A method to perform self myofascial release.
  • It can be used as a mobilization tool for soft tissues even near or around boney articulations.
  • It is an excellent tool for home exercise programs.
  • It can be easily adapted for use on multiple areas of the body.
  • An effective tool which one can easily travel with.

How should I use the foam roller?

  • I typically recommend one to three minutes of body weight rolling (if it is tolerated) per extremity, and the same for the thoracic, low back, and buttock area.
  • A good rule of thumb is to roll out an area that is tender and sore (or recently worked) until it no longer feels tight and sore.
  • Again, approximately one to three minutes per area although this may vary based on your size. Increased time will be needed the more developed your muscles are.
  • Use the foam roll on tight or restricted areas prior to performance without risk of deleterious effects (unlike static stretching).
  • Use the foam roll after exercise or competition to speed up recovery times and decrease the risk of muscle soreness or restriction.
  • The foam roller can also be used as an aid to increase the intensity of a stretch during static stretching activities.

Foam rollers come in many different lengths and sizes. Each size has a slightly different purpose and use.  For most individuals, the three foot long by six inch diameter size will be the most versatile.  You can purchase a quality foam roller for a good price online on Amazon.

For photos and detailed descriptions of the exercises which I demonstrated in the video, opt-in to my e-mail list for instant access to My Top 8 Stretches to Eliminate Neck, Upper Back, and Shoulder Pain.

For more information on the use of a foam roller, please refer to Does Foam Rolling Help or Hurt Performance?

What has your experience been like with using the foam roller? Is it worth the effort?  Please share your comments or questions below.

Join our growing community on Facebook by liking The Physical Therapy Advisor!  If you have a question that you would like featured in an upcoming blog post, please e-mail contact@thephysicaltherapyadvisor.com.

How to Properly Perform Pendulum Exercises

In this video, I demonstrate the proper technique for performing shoulder pendulum exercises. Shoulder pendulum exercises are frequently utilized early in the rehabilitation process to help maintain a basic amount of shoulder motion as well as to promote blood flow to aid in the healing process.  When performed correctly, these important exercises provide very little stress to the recovering structures.  Pendulum exercises help to maintain a baseline amount of motion which is critical in promoting blood flow for proper tissue healing, for pain management, and in order to avoid frozen shoulder syndrome (adhesive capsulitis).  Shoulder pendulum exercises are typically one of the first exercises allowed post-surgery or shoulder injury in conjunction with elbow, hand, and wrist exercises (depending on the injury).

In this video, I explain the basics of how to properly perform pendulum exercises. Although these exercises are basic, they are typically performed incorrectly by utilizing active motion instead of a passive motion.  Pendulum exercises are commonly utilized after rotator cuff repair, sub acromial decompression surgery, collarbone fracture and/or surgery, total shoulder replacement/total shoulder arthroplasty, and frozen shoulder (adhesive capsulitis).

Have you performed shoulder pendulum exercises before? If so, did you make these common mistakes?  Please leave your comments below.

If you have a question that you would like featured in an upcoming blog post, please comment below or submit your question to contact@thePhysicalTherapyAdvisor.com. Be sure to join our growing community on Facebook by liking The Physical Therapy Advisor!

How to Use Shoulder Pulleys to Regain Shoulder Motion

In this video, I demonstrate how to utilize over-the-door shoulder pulleys.  Shoulder pulleys are an excellent way to use active assistive motion to regain motion in the shoulder post injury or surgery.  In this video, I explain the basics of how the shoulder pulley works.  They are frequently utilized early in the rehabilitation process to not only help regain motion, but to also promote blood flow which aids in the healing process.

Shoulder pulleys are commonly utilized after rotator cuff repair, sub acromial decompression surgery, collarbone fracture and/or surgery, total shoulder replacement/total shoulder arthroplasty, and frozen shoulder (adhesive capsulitis).  I also instruct many of my clients to utilize shoulder pulleys for pain management as well as a prevention strategy for arthritis and loss of shoulder motion and function.

Have you used shoulder pulleys before? If so, what was your favorite way to utilize them?  Please leave your comments below.

If you have a question that you would like featured in an upcoming blog post, please comment below or submit your question to contact@thePhysicalTherapyAdvisor.com. Be sure to join our growing community on Facebook by liking The Physical Therapy Advisor!