How to Prevent an Ankle Sprain

Ankle sprains and strains are a common everyday occurrence.  In most cases, the injury is nothing more than a nuisance that temporarily affects your training and mobility.  However, severe cases can lead to a lengthy rehabilitation and even surgery.

Once you have experienced an ankle sprain, you’re at a higher risk for repeated injury.  Even a minor sprain can derail your training or race day preparations.  In order to avoid an ankle sprain, it’s critical to adopt a prevention strategy as part of your cross training routine.  Strength, balance, and adequate foot and ankle mobility are the key components to preventing an ankle sprain/strain.  Continue Reading

Treating Ankle Sprains and Strains (2017)

HAVE YOU EVER INJURED YOUR ANKLE AND ICED IT LIKE YOU’RE “SUPPOSED TO,” AND THEN LATER DOWN THE ROAD YOU RE-INJURE IT YET AGAIN?

Yes!  Ankle sprains and strains are a common everyday occurrence and even the mildest of sprains can temporarily affect your training and mobility.  A sprain/strain can lead to chronic issues and loss of performance later in life when not properly cared for and managed.  Severe cases can lead to lengthy rehabilitation and even surgery.

Icing alone won’t heal the injury over time, and then the doctor bills start to add up as you seek help.  With the cost of healthcare on the rise and no sign of that trend improving, it’s even more necessary to learn how to safely self-treat and manage common musculoskeletal and mobility related conditions.

How about a better way to safely self-treat and manage an ankle sprain/strain?

When you can confidently self-treat, you can limit pain levels, return to activity faster, prevent reoccurrences, and save money!  In Treating Ankle Sprains and Strains, you will learn how to confidently self-treat in order to resume your training and normal activities without the risk of additional damage, injury or re-injury.

I will walk you through the treatment plan on how to rehabilitate your ankle by beginning with the acute phase of rehabilitation through the intermediate (sub-acute) phase of rehabilitation and concluding with a return to full activity and sport.  In this step-by-step rehabilitation guide (complete with photos and detailed exercise descriptions), you will discover how to implement prevention and rehabilitation strategies so that you can safely return to activity.  Let’s get started!

Why a Simple Ankle Sprain can lead to Long Term Debility

Ankle sprains are the most common orthopaedic injury and can happen to anyone at any age.  In general, an ankle sprain occurs when you twist your ankle too far.  It causes the ligaments (which support the ankle) to get stretched and/or torn.  Depending on the severity and the ligament damaged, a sprain may take from several weeks to months to fully heal.  The more pain, swelling, and bruising you experience initially often indicates the severity of the injury (possibly indicating a longer recovery).

An ankle sprain is such a common occurrence that it’s often marginalized as an injury.  Most people simply take it easy for a while until the pain of the sprain decreases to point that normal activities can be resumed.  What many people do not realize is that a poorly rehabilitated sprained ankle can lead to long term debility.  It can be even be associated with pain and debility elsewhere as the body is forced to compensate for a poorly functioning ankle.

One of the most common issues following an ankle sprain is the lack of dorsiflexion (the ability to move the ankle up toward the shinbone).  This loss of ankle mobility forces a person to alter his/her gait pattern to compensate for the lack of mobility by taking shorter steps or rotating his/her leg or foot externally (outward).  Over time, this causes additional stress and potentially pain and/or injury in the arch of the foot, knee, and hip.

As a physical therapist, I have treated many people who have experienced a past ankle sprain which led to poor ankle mobility.  Now they are experiencing a myriad of orthopaedic issues simply from a past ankle sprain.

In addition, a chronically sprained or severely sprained ankle that isn’t properly treated could present with ligament deficiencies.  This means that one or more of the ligaments in the ankle were completely torn or significantly overstretched.  An unstable ankle that is not rehabilitated appropriately tends to force individuals into self-regulating activities.  Some slowly become more sedentary either due to ongoing pain or the fear of falling.  In a well rehabilitated ankle, one can learn to compensate by utilizing muscle strength and motor control in order to manage pain and discomfort while maintaining mobility.  In some cases, surgical intervention will be required to repair the torn ligaments.

The importance of proper treatment and rehabilitation after even a minor ankle sprain cannot be overstated!  The key is to insure that you completely recover from the injury.  Otherwise, you’re at risk for repeated injury when you don’t complete the necessary course of rehabilitation.  Once you have experienced an ankle sprain, you are more likely to experience another one if you don’t properly rehabilitate your ankle and address any precipitating factors that may increase your risk of repeated injury.

Knowing how to effectively self-treat and manage ankle sprains and strains is important in order to resume your training and normal activities without the risk of additional damage, injury or re-injury.  When you can confidently self-treat, you can limit pain levels, return to activity faster, and prevent reoccurrences.

AVAILABLE NOW ON AMAZON!

In my book, Treating Ankle Sprains and Strains, you will learn how to safely and confidently self-rehabilitate a common ankle sprain.  It will guide you through the ins and outs of self-treating your ankle so you can avoid costly rehabilitation bills.  Beginning with the acute phase of rehabilitation, I will walk you through the treatment plan on how to rehabilitate your ankle through the intermediate (sub-acute) phase of rehabilitation and return to full activity and sport.

Learn how to safely self-treat and properly rehabilitate your ankle so you can get back to your daily life and exercise goals more quickly without additional costly medical bills!

BUY NOW

How to Self-Treat an Ankle Sprain (Part III)

As a physical therapist, I find that the most exciting part of a person’s rehabilitation is the full return to function, activity, or sport.  Countless variations of exercises and activities are performed while working toward restoring the full functional use of the ankle.  Concluding the three part series, the final stage in rehabilitation is centered on improving ankle and foot strength, stability, as well as addressing any balance deficits.

How rehabilitation progresses will vary greatly for each individual.  Therefore, no treatment plan will be alike.  For discussion purposes, I will address a generic treatment plan, which should be modified for your personal needs and activity level.  In this final stage of rehabilitation, you will progress to normal daily activities, including any athletic endeavors.  This is also when you work toward limiting any future reoccurrences of the sprain.

At this stage in recovering from a lateral ankle sprain, you should be walking relatively normally and mostly pain-free.  Running and more active side-to-side movements likely still cause pain.  Although not contra-indicated, these types of activities should be limited (unless you’re wearing a good lace up brace or are being regularly taped by a professional).

The initial portion of the rehabilitation is centered on improving ankle and foot strength, stability, as well as addressing any balance deficits.  This process begins with statically based exercises and activities.  Ultimately, it progresses into dynamic strength, balance, and mobility activities.  How rapidly a person progresses in this phase is wildly variable.  The key is to progress at your own pace.  If you start experiencing increasing pain, feelings of ankle instability, and sensations that it may “roll” or sprain again, then you need to taper down your activity level.  After the pain subsides, continue to focus on the activities that that didn’t cause pain or discomfort previously.

The following treatment plan includes exercises for strength and balance as well as mobility drills and full athletic simulation drills.  Each category is listed in an easiest to most challenging format.  You shouldn’t progress to the next exercise until the first one is mastered.

Strength

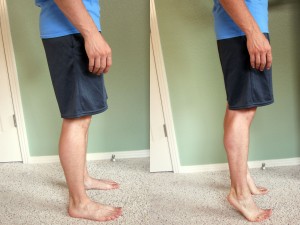
  • Heel/Toe Raises – A person should be able to perform 25 heel raises in a row with only minimal fingertip assistance on a counter top.  A normal amount of calf strength would be considered once you can perform 25 heel raises. 

HeelToeRaisesCollage

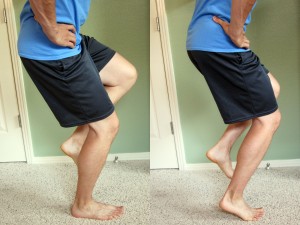
  • One Leg Squat – Perform a one leg squat without using your hands for balance to increase the difficulty level.  The one leg squat on your tip toes is a harder variation which involves more calf muscle activation.  Start with two sets of 10 repetitions, then progress to three sets of 10 repetitions.

OneLegSquat_Collage

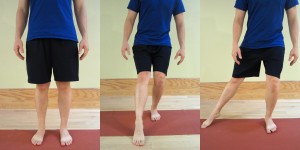
  • Clock Exercise – Stand on your affected (injured) foot and attempt to touch your tip toe of the non-affected side as far out as you can reach.  Bring your foot back to the center or starting point according to the hands on a clock.  For example, 1 o’clock to 6 o’clock (clock-wise) or 12 ‘o clock to 6 o’ clock (counter clock-wise) depending on which foot is affected.  Perform the routine between three to five times slowly.

ClockExercise

Balance

  • Stand on one foot – A 30 second hold with eyes open during the first time, then closed during the second time, is considered normal.
  • Stand on one foot on a pillow – A 30 second hold for two to three repetitions.  As you progress, stand on the pillow and perform the Clock Exercise as described above.
  • Stand on one foot and bounce a ball against a wall.
  • Stand on a Wobble Board, Bosu Balance Trainer or other unstable surface.

Mobility Drills

  • Initially, start with forward and backward movements and progress from a walk, to a jog, to a sprint.
  • Jump Rope
  • Side Stepping – Progress the speed as pain allows and if you’re not experiencing the feeling of instability.
  • Karaoke or Grapevine – Walk or run sideways while alternating the placement of the foot either in front or behind the other.
  • Sprint Ladder – A number of agility drills can be performed with the sprint ladder.  Search YouTube and pick your favorite video which closely mimics the footwork desired for your particular sport or activity.
  • Short side-to-side Wind Sprints – While sprinting, touch your hand to the ground at each change of direction.

Full Athletic Simulation Drills

  • Depending on your sport of choice, return to your sport specific training drills.  You may still require additional support.  I recommend wearing a good lace up brace or being taped by a professional for support.  Additional support should only be used temporarily and with the intention of progressing from using them as your ankle can tolerate.

If you continue to experience pain and swelling, and/or require an accelerated time table for recovery (or return to competition), then I recommend the services of a sports medicine physical therapist or athletic trainer.  Many modalities, such as electrical stimulation, manual techniques and taping methods can assist in recovery when properly utilized.  To find a qualified physical therapist in your area, search at American Physical Therapy Association (APTA).

Depending on your time table for recovery and the severity of your injury, the information provided in this three part series on ankle sprains will likely be very helpful in your recovery.  Each person and injury is different.  If you’re interested in a more complete and comprehensive look at self-rehabilitating an ankle sprain, be sure to check out Treating Ankle Sprains and Strains.

Knowing how to effectively self-treat and manage ankle sprains and strains is important in order to resume your training and normal activities without the risk of additional damage, injury or re-injury.  When you can confidently self-treat, you can limit pain levels, return to activity faster, and prevent reoccurrences.

AVAILABLE NOW ON AMAZON!

In my book, Treating Ankle Sprains and Strains, you will learn how to safely and confidently self-rehabilitate a common ankle sprain.  It will guide you through the ins and outs of self-treating your ankle so you can avoid costly rehabilitation bills.  Beginning with the acute phase of rehabilitation, I will walk you through the treatment plan on how to rehabilitate your ankle through the intermediate (sub-acute) phase of rehabilitation and return to full activity and sport.

Learn how to safely self-treat and properly rehabilitate your ankle so you can get back to your daily life and exercise goals more quickly without additional costly medical bills!

BUY NOW

How to Self-Treat an Ankle Sprain (Part II)

Ankle sprains are one of the most common and prevalent musculoskeletal injuries.  Although more likely to occur in children, ankle sprains can happen to anyone anytime.  In my last post, How to Self-Treat an Ankle Sprain (Part I), I addressed how to handle the initial acute phase of an ankle sprain.  I will continue to guide you through the treatment plan on how to rehabilitate your ankle in this three part series by addressing the progression from the acute phase into the intermediate phase.

Sprains are categorized as Grade I, II, or III.  A Grade I sprain is the most common.  It’s typically associated with only mild damage to the ligament, and instability doesn’t affect the joint.  A Grade II sprain is a partial tear to the ligament and is usually associated with some laxity (hypermobility).  If this occurs, it’s best to wear a brace for several weeks.  Ideally, scar tissue will form and compensate for the lax ligament, so the joint doesn’t become hypermobile.  Good muscle strength and proprioception of the lower foot is important to limit future sprains.  In Grade III sprains, a full tear of the ligament occurred.  One typically consults with an orthopaedic surgeon for possible repair.  After surgery, a guided physical therapy program is recommended.

For discussion purposes, I will only address a Grade I sprain.  Initially, one may wear an air splint, ACE wrap, or some other lace-up or slip-on style brace to help with stability, inflammation, and pain control of the ankle.  In most cases, a person will want to transition from wearing the brace as soon as the initial pain subsides.  (If one had a Grade II sprain, he/she would wear a splint for several weeks so that the ankle would initially stiffen.)

At this point in your recovery, you are likely three to seven days since the initial injury.  This phase of rehabilitation can last from seven days to several weeks before progressing into the final phase of rehabilitation (and ultimately, back to full function).  Progression out of the intermediate phase is always symptom dependent.  You should be able to stand with equal weight on your feet and not experience an increase in ankle pain.  The ankle is likely stiff at this time, but it is time to start walking, progress range of motion (ROM), and start gentle resistive exercises.

Walking

If you have been using a crutch to unweight the foot, then start the progression to weight bearing during walking.  If you have been walking, then increase the amount of weight you have been putting on the ankle and foot.  At this time, the focus will be to normalize your walking pattern.  This means having a good heel strike, rolling onto the foot into full weight bearing on the leg, and then propelling forward with a good toe off.  You will continue to use the crutch as long as needed until you can walk nearly normal without limping.  Until then, utilize the crutch to unweight the leg and foot as much as necessary to perform a nearly normal walk or gait sequence.

Range of Motion (ROM)

Start to increase the range of motion of the ankle.  Initially, work to progress the plantarflexion and dorsiflexion movement (the forward and backward movement of the ankle).  As pain subsides, progress the side to side motion as well as all other motions.

Recommended Exercises:

Ankle Pumps – A very easy exercise.  Just pump your ankle forward and backward into plantarflexion and dorsiflexion movement.  Perform 10-15 repetitions several times a day on both feet.

Ankle_Combined

Ankle Alphabet – Move the foot and ankle only by pretending your big toe is a pen, and draw the alphabet using capital letters.  Perform 1-2 times a day.

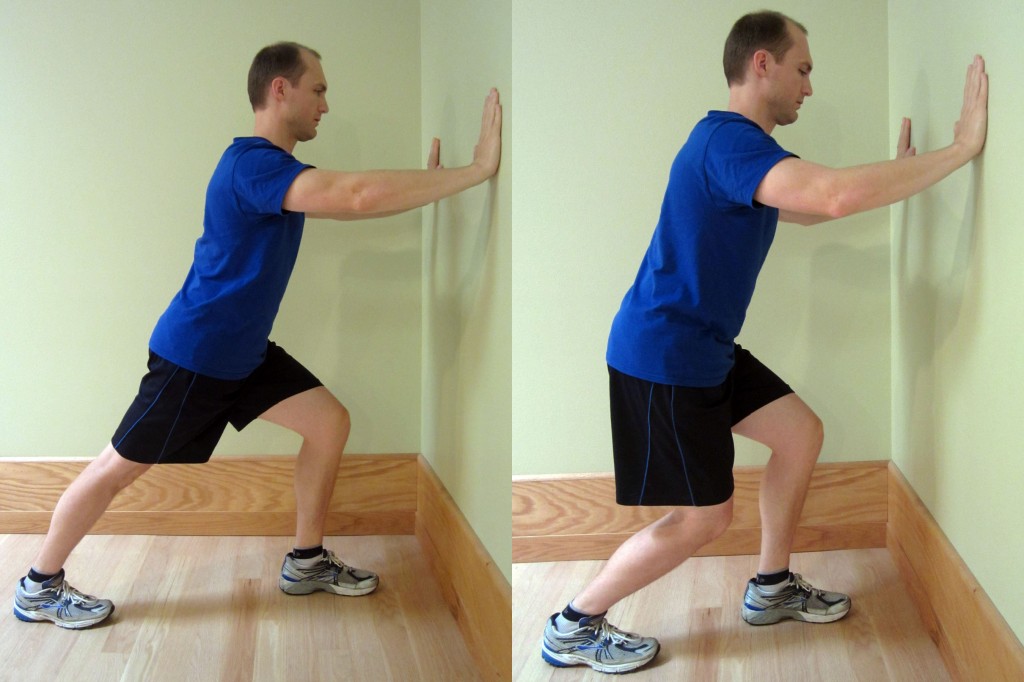
Calf Stretching – Hold each stretch for at least 30 seconds, three times on each leg, 2-3 times a day.  This stretch shouldn’t cause more than a mild increase in pain or discomfort.
Calves

Gentle Resistive Exercises

Perform plantarflexion and dorsiflexion movement by initially using an exercise band.  I recommend using a Thera-Band Exercise Band.  As your pain improves, you can progress to standing heel and toe raises as long as you don’t experience more than a mild increase in pain levels.

As pain and range of motion improve, progress to inversion and eversion with the exercise band.  Stop if you experience more than a mild increase in pain levels.

Initial Balance and Proprioception Exercise

Stand on one foot. Initially, you may need to use your hand (or a finger) on a counter top for added support.  As the pain subsides and your balance improves, you may need to increase the difficulty level.  As you progress, balance will become of greater importance.

Toward the end of the intermediate phase, you should be walking fairly normally.  There will likely be some swelling.  It’s typical for some amount of swelling to come and go.  It will be directly related to how long you are on your feet and your general lower extremity circulation.  I highly recommend you continue to wear compression stockings during this time.  You may also continue to experience soreness and pain–particularly after a long day or a lot of upright activity.  Continue to utilize a regular icing protocol as needed for pain and swelling.  Also, continue to supplement with CapraFlex.

It’s time to progress into the final stage of rehabilitation once you have returned to near normal walking, your pain levels are relatively low, and you are able to complete the basic exercises listed above.  The final stage of rehabilitation includes a full return to daily activities and eventually, all sport or athletic activities.  I will address the specifics of the final stage of rehabilitation in Part III.

Knowing how to effectively self-treat and manage ankle sprains and strains is important in order to resume your training and normal activities without the risk of additional damage, injury or re-injury.  When you can confidently self-treat, you can limit pain levels, return to activity faster, and prevent reoccurrences.
AVAILABLE NOW ON AMAZON!

In my book, Treating Ankle Sprains and Strains, you will learn how to safely and confidently self-rehabilitate a common ankle sprain.  It will guide you through the ins and outs of self-treating your ankle so you can avoid costly rehabilitation bills.  Beginning with the acute phase of rehabilitation, I will walk you through the treatment plan on how to rehabilitate your ankle through the intermediate (sub-acute) phase of rehabilitation and return to full activity and sport.

Learn how to safely self-treat and properly rehabilitate your ankle so you can get back to your daily life and exercise goals more quickly without additional costly medical bills!

BUY NOW
How to Self-Treat an Ankle Sprain (Part I)

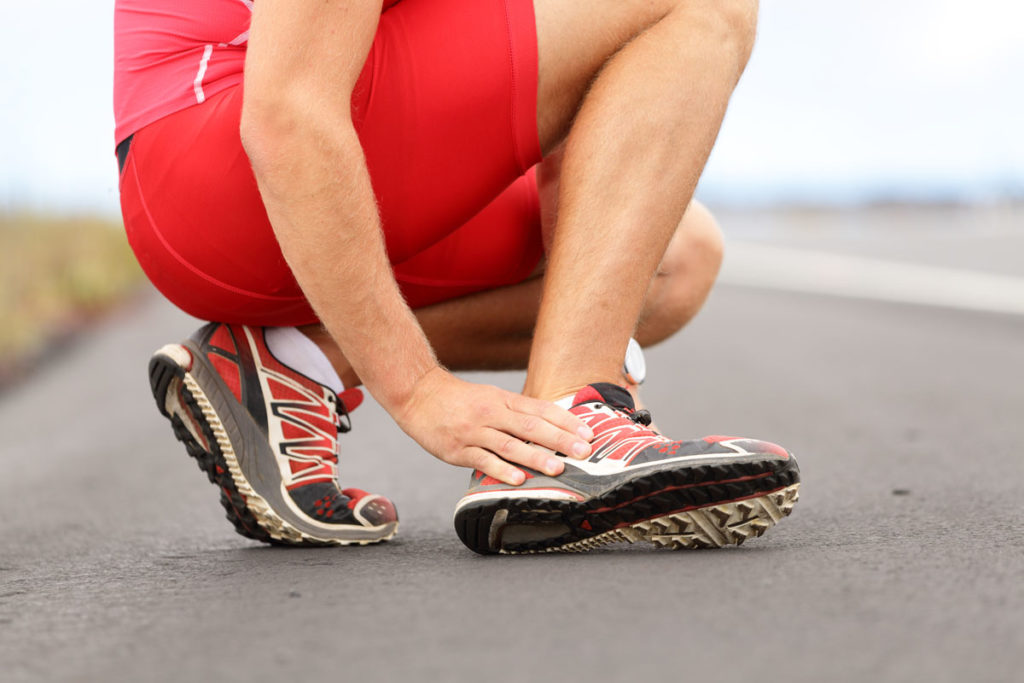
Ankle sprains are a common occurrence and can happen to anyone at any age.  The Journal of Sports Medicine (January 2014) conducted a meta-analysis on the topic of ankle sprains.  The findings concluded that women were at higher risk of ankle sprains and that children were more likely to sprain an ankle than an adolescent or an adult.  Indoor and court sports were the highest risk activity.  However, an ankle sprain can occur just as easy from stepping off a curb or accidentally on a pet’s toy.  So what is the best course of action to take upon spraining your ankle?  Starting with the acute phase, I will walk you through the treatment plan on how to rehabilitate your ankle in this three part series.  (If you’re interested in a more complete and comprehensive look at self-rehabilitating an ankle sprain, be sure to check out Treating Ankle Sprains and Strains).

AnkleSprain_1

Many different types of ankle sprains are possible, but the most common sprain is known as the lateral ankle sprain.  Initially during a lateral ankle sprain, the foot rolls inward (inverts) farther than it should which causes a “sprain” of the lateral ligaments of the ankle.  It may also affect the lateral muscles or tendons of the ankle which produce eversion of the foot.  The muscles most typically affected are known as the peroneals.  In more severe cases, the fibula bone or the fifth metatarsal bone near the pinky toe could also be injured either with a fracture or the tendon could rupture from the bone.

For discussion purposes, I will only address the basic lateral ankle sprain.  At the time of injury, a person may often feel or hear a popping sound.  This is followed by a fairly rapid onset of swelling in the ankle, typically along the lateral (outside) part of the ankle (near the bump known as the lateral malleolus).  This is also usually associated with a significant amount of pain.

Depending on the severity of the pain, the location of the swelling, and any potential bruising, your course of treatment may vary.  If you are unsure as to the severity of the sprain, are in severe pain, or you’re not sure how to handle the injury, I recommend that you seek competent advice from a medical doctor, physical therapist, or athletic trainer.

Assuming you don’t have a more serious injury, the initial course of treatment following the sprain includes RICE, which stands for Rest, Ice, Compression, and Elevation.

  • Rest – In this case, rest would indicate not using the ankle.  I would initially recommend using a crutch or crutches to either fully unweight the ankle (or at least take some pressure off) when walking.
  • Ice – Apply ice to the ankle, and the sooner, the better.  The rule for icing is to apply ice no more than twenty minutes per hour.  Do not place the ice directly against the skin, especially if you are using a gel pack style.  Individuals with poor circulation or impaired sensation should take particular care when icing.  A bag of frozen peas can be ideal.
  • Compression – Compression helps prevent and decrease swelling.  Swelling can cause increased pain and slow the healing response, so limit it as much as possible.  You can utilize a common ACE wrap or you can purchase a pair of mild over-the-counter compression socks.  If you have a friend who is medically trained, many different taping techniques can also assist in decreasing swelling.  Many physical therapists or athletic trainers can apply Kinesiology Tape or Mummy Tape for you or you can find application techniques online.
  • Elevation – Elevate means to keep the ankle above the level of the heart.  This allows for gravity to assist in keeping the inflammation and swelling down.  Typically, I would combine the ice with compression and elevation.

Gentle Movement

During the acute phase, move the ankle as much as you can tolerate.  I would not be aggressive with the movement.  I would not move the ankle if it caused more than a mild to moderate increase in pain.  This may irritate the injury and cause more swelling and inflammation.  Movement is good and helpful unless it’s causing extreme pain.  Focus on the up and down movement of the ankle (known as plantarflexion and dorsiflexion), NOT on the side to side motion (known as inversion and eversion).

Possible Supplementation

During the acute phase, I recommend starting at least a thirty day course of CapraFlex.  Capra Flex is an organic glucosamine and chondroitin supplement which also includes an herbal and spice formulation designed to naturally decrease inflammation and support healing.  I recommend it to anyone recovering from an injury or attempting to prevent injury when performing at a very high level.  I personally use it, and in my practice, it has helped clients recover faster and prevent injury.  It can interfere with some blood thinning medication, so if you are on this type of medication, please check with your physician.

The initial acute phase of an ankle sprain can last one to seven days on average.  Before progressing into the next phase of rehabilitation, you should be able to stand with equal weight on your feet and not have a significant increase in pain.  Once you can, it is time to progress into the intermediate phase (to be covered in Part II).

Knowing how to effectively self-treat and manage ankle sprains and strains is important in order to resume your training and normal activities without the risk of additional damage, injury or re-injury.  When you can confidently self-treat, you can limit pain levels, return to activity faster, and prevent reoccurrences.

AVAILABLE NOW ON AMAZON!

In my book, Treating Ankle Sprains and Strains, you will learn how to safely and confidently self-rehabilitate a common ankle sprain.  It will guide you through the ins and outs of self-treating your ankle so you can avoid costly rehabilitation bills.  Beginning with the acute phase of rehabilitation, I will walk you through the treatment plan on how to rehabilitate your ankle through the intermediate (sub-acute) phase of rehabilitation and return to full activity and sport.

Learn how to safely self-treat and properly rehabilitate your ankle so you can get back to your daily life and exercise goals more quickly without additional costly medical bills!

BUY NOW

Q & A: Do I have Carpal Tunnel Syndrome?

Q.  My hand grip has been feeling weak, and I have noticed some tingling in my first two fingers.  Do I have Carpal Tunnel Syndrome?  I use my hands all day long, and I can’t miss work for surgery.  Is there anything I can do?  -Jared

A.  Thanks, Jared, for the great question!  Carpal Tunnel Syndrome (CTS) is a very common cause of hand pain and weakness.  It’s also often associated with numbness and tingling particularly in the thumb and first (index) and second (middle) finger.  It’s often accompanied with associated motor control issues within these fingers.  The symptoms tend to start gradually and typically worsen over time.  The pain can get to a point that is unbearable.  One can lose functional use of their hands because of the pain, numbness, and associated lack of motor control.

Symptoms of Carpal Tunnel Syndrome:

  • Pain in the wrist, palm of your hand, and/or fingers.
  • Numbness and tingling in the thumb and first (index) and second (middle) finger.  The median nerve is affected.  The fourth (ring) finger and pinky finger are not directly affected because it’s a different nerve (ulnar).  Along with numbness and tingling, many people will describe an electric shock type feeling in these same fingers.  Initially, the numbness and tingling is intermittent, but it can progress into a constant sensation.
  • People describe the lack of hand control and the tendency to drop objects.

Symptoms tend to worsen when gripping or performing hard manual labor, including repetitive motions with the hands that involve flexion (closing) of the hand.  Symptoms are often worse at night and may even wake you up.

Causes and Risk Factors for Carpal Tunnel Syndrome:

  • Pressure over the median nerve near the palm of the hand in the “Carpal Tunnel” which is a type of passageway from your forearm to your wrist.
  • Repetitive motion.  CTS is typically viewed as a repetitive motion or overuse injury.  Repetitive gripping and heavy use of the hands can lead to irritation of the median nerve.  This means that professions involving heavy use or repetitive use of hands (particularly, if there is vibration) are at higher risk of developing CTS.  This can range from manual laborers to pianists or typists.
  • Scar tissue build up and/or fascial restrictions in or around the carpal tunnel from repetitive use or trauma such as repeated compression.  Chronic vibration of the hands and arms is a risk factor.  Examples include heavy use of power tools (such as a jack hammer) or motocross racing.
  • A wrist fracture can narrow the tunnel space from swelling and inflammation or cause deformation of the bones in the wrist.
  • Swelling and inflammation from other pathologies such as Rheumatoid arthritis or cysts.
  • Any injury or pathology that causes deformation of the bones in the wrist that places additional pressure on the median nerve.  This would include obesity as fat deposits can reduce the space within the carpal tunnel.
  • Females are more likely than men to develop CTS.  This is likely due to anatomical variations where the carpal tunnel is typically smaller in women versus men.  This allows the area to be more easily compromised or affected from other causes.
  • Fluid retention may increase the pressure within your carpal tunnel and be irritating the median nerve.  This is common during pregnancy and menopause.  CTS associated with pregnancy will typically resolve on its own after pregnancy.
  • Muscle imbalances between wrist flexion and extension strength.
  • Mobility related issues in the wrist, shoulder, thoracic, and cervical spine.

CTS can be straightforward with a very typical mechanism of injury or can be very difficult to treat because of multiple factors leading to the syndrome.  Often it’s a multitude of risk factors that cause the symptoms in addition to anatomical variations from person to person.  Other compounding factors include:  diabetes; thyroid disease; kidney failure; other forms of inflammatory arthritis; poor posture; and cervical and thoracic derangements.

Poor wrist, shoulder, cervical, and/or thoracic mobility is often associated with CTS and other spine and/or upper extremity pain syndromes.  I find that even in the clearest cut of cases it’s always best to screen for other potential causative factors by starting with the cervical spine and working down the chain into the hand.  Whenever one part of the body doesn’t have adequate mobility, another part will do more to allow for the movement to take place.

My Top Recommendations to Alleviate Pain associated with Carpal Tunnel Syndrome:

Identify the offending movement.

If you’re experiencing CTS pain, try to identify which specific movement aggravates the symptoms.  Once you identify the movement, find ways to either avoid the motion or to change how you perform the activity as to not cause the symptoms.  This may mean adjusting your posture or body position or using an adaptive device to help your body compensate for the activity.  Eliminate as many of the noted risk factors from your daily activities as you can.

Work on your grip strength through extension movements.

Don’t just work on wrist flexion or gripping exercises.  Also work on finger and wrist extension in order to improve your grip strength.  Often in the case of CTS, there is a muscle imbalance between your ability to flex your fingers and wrist versus extending your fingers or wrist.  Work on extension biased exercises.  Your grip strength will improve more rapidly as your wrist and hand muscles find their optimal length tension relationship (which allows for maximum strength production).

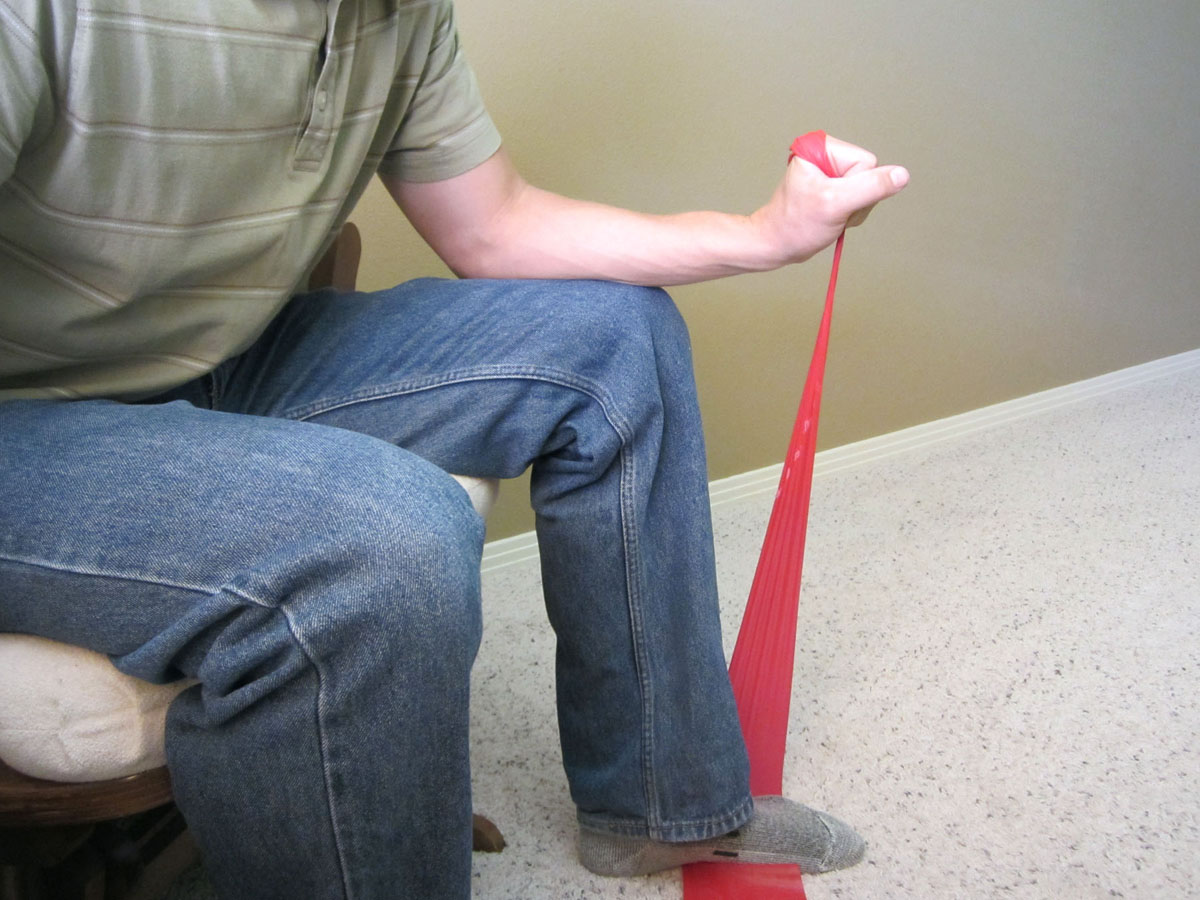
For wrist extension, use an exercise band (as demonstrated below) to perform two to three sets of 20 repetitions.  Extend the wrist up, and then slowly back down toward the floor.  Be sure to move very slowly during the eccentric/muscle lengthening position (when your hand returns to the floor).

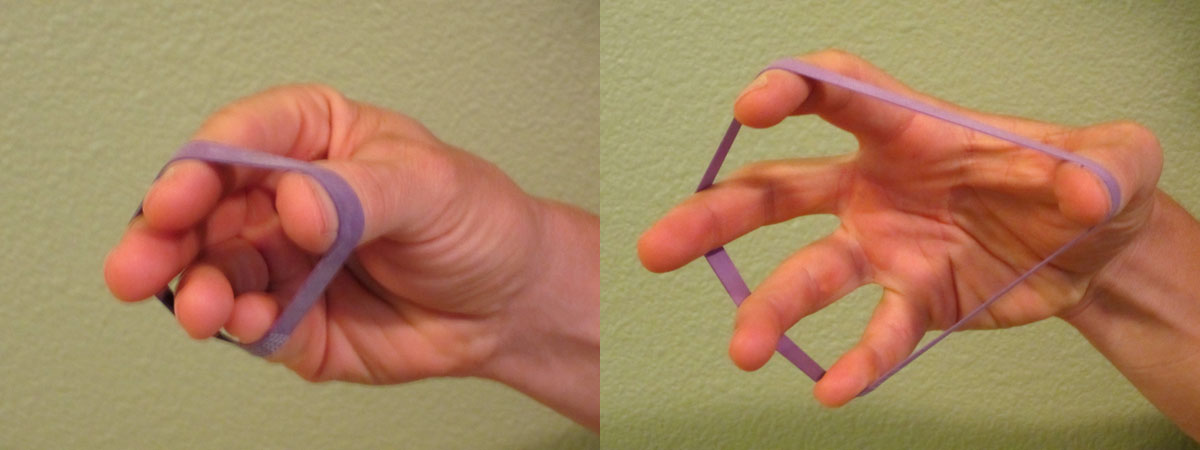
To improve finger extension strength, I often recommend using a thick rubber band as a way to improve finger extension strength (as demonstrated below).  Work on extending each finger equally when performing two sets of 10-15 repetitions multiple times per week.

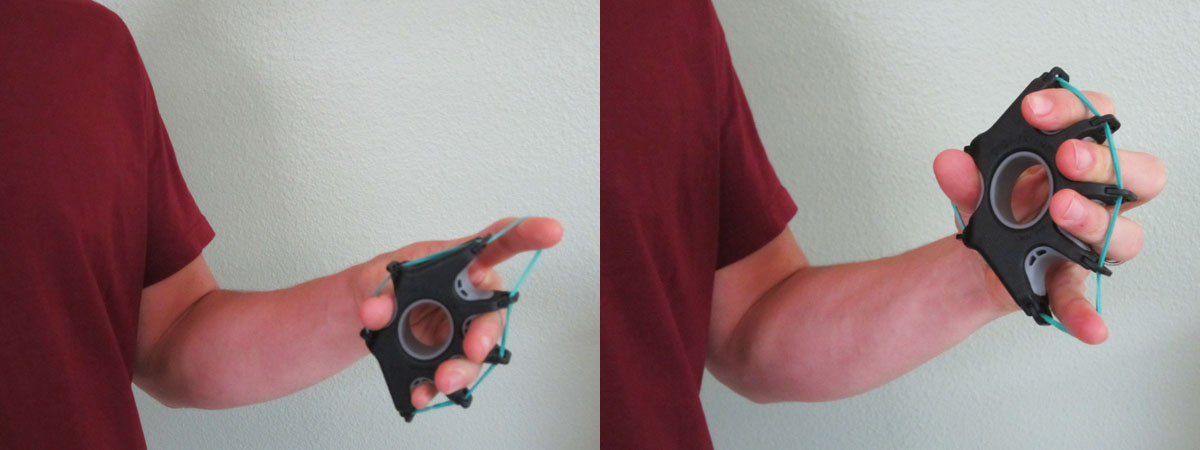
If you want to be more precise and have the ability to exercise one finger at a time, try a device such as the CanDo® Digi-Extend® Hand Exerciser.  This is an excellent tool to improve finger extension strength.  It allows you to work the fingers in multiple ways including individually for rehabilitation purposes and as an important hack to improve overall grip strength (as described above).  It also allows for customization of resistance so you can track progress.

Stretch.

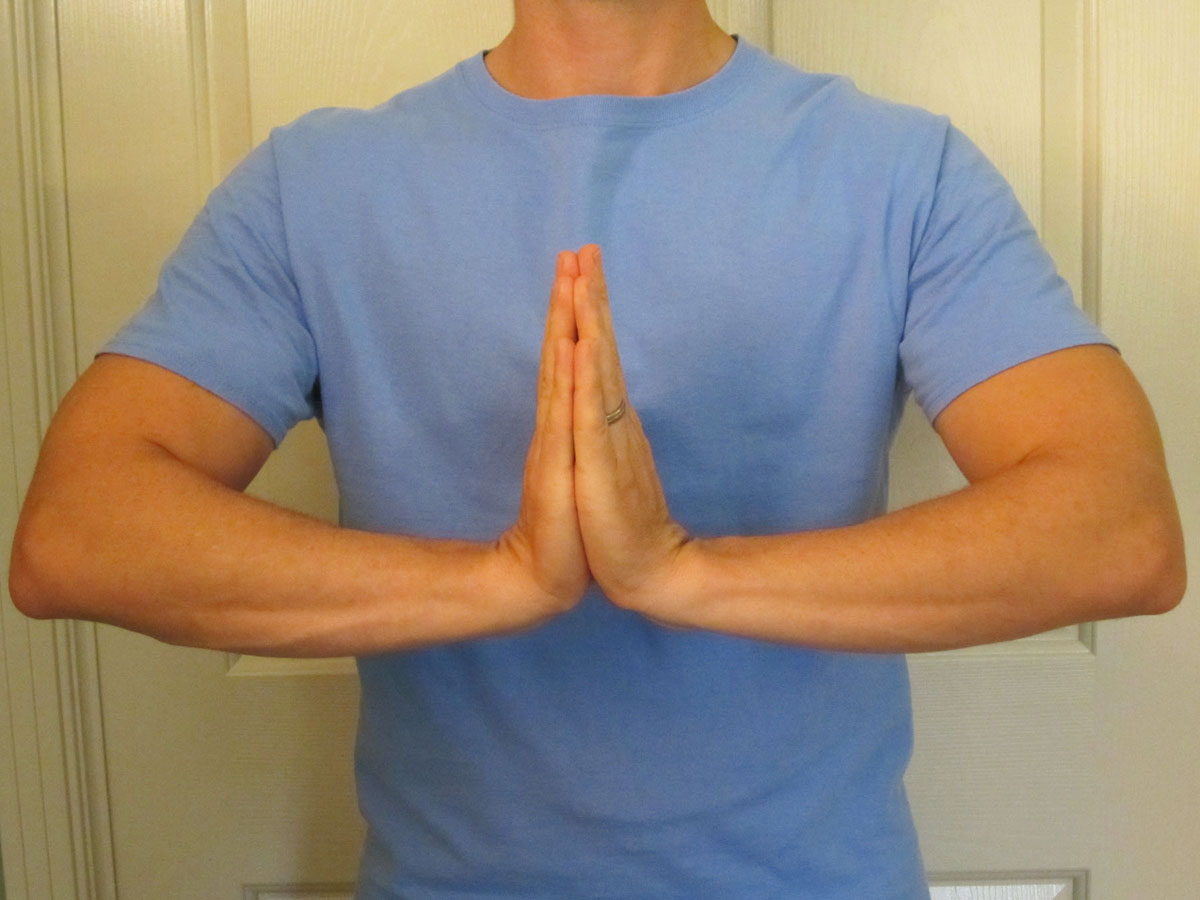
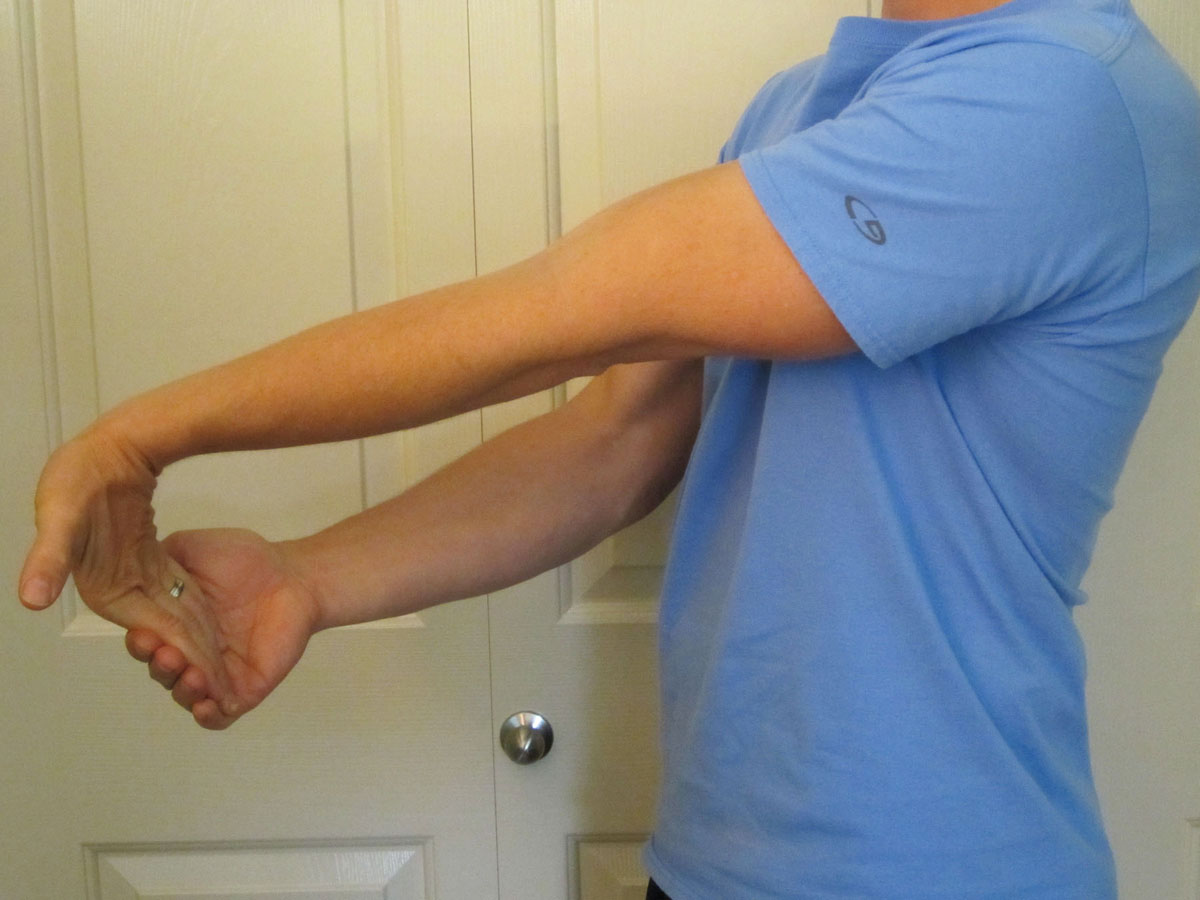
I suggest stretching the fingers and wrist multiple times a day.  Your fingers and wrist should have mobility in all directions.  Particularly focus on wrist extension (as demonstrated below).  Perform two to three sets of a 30 second stretch three to five times per day as long as you do not reproduce your CTS symptoms.

Work on your mobility.

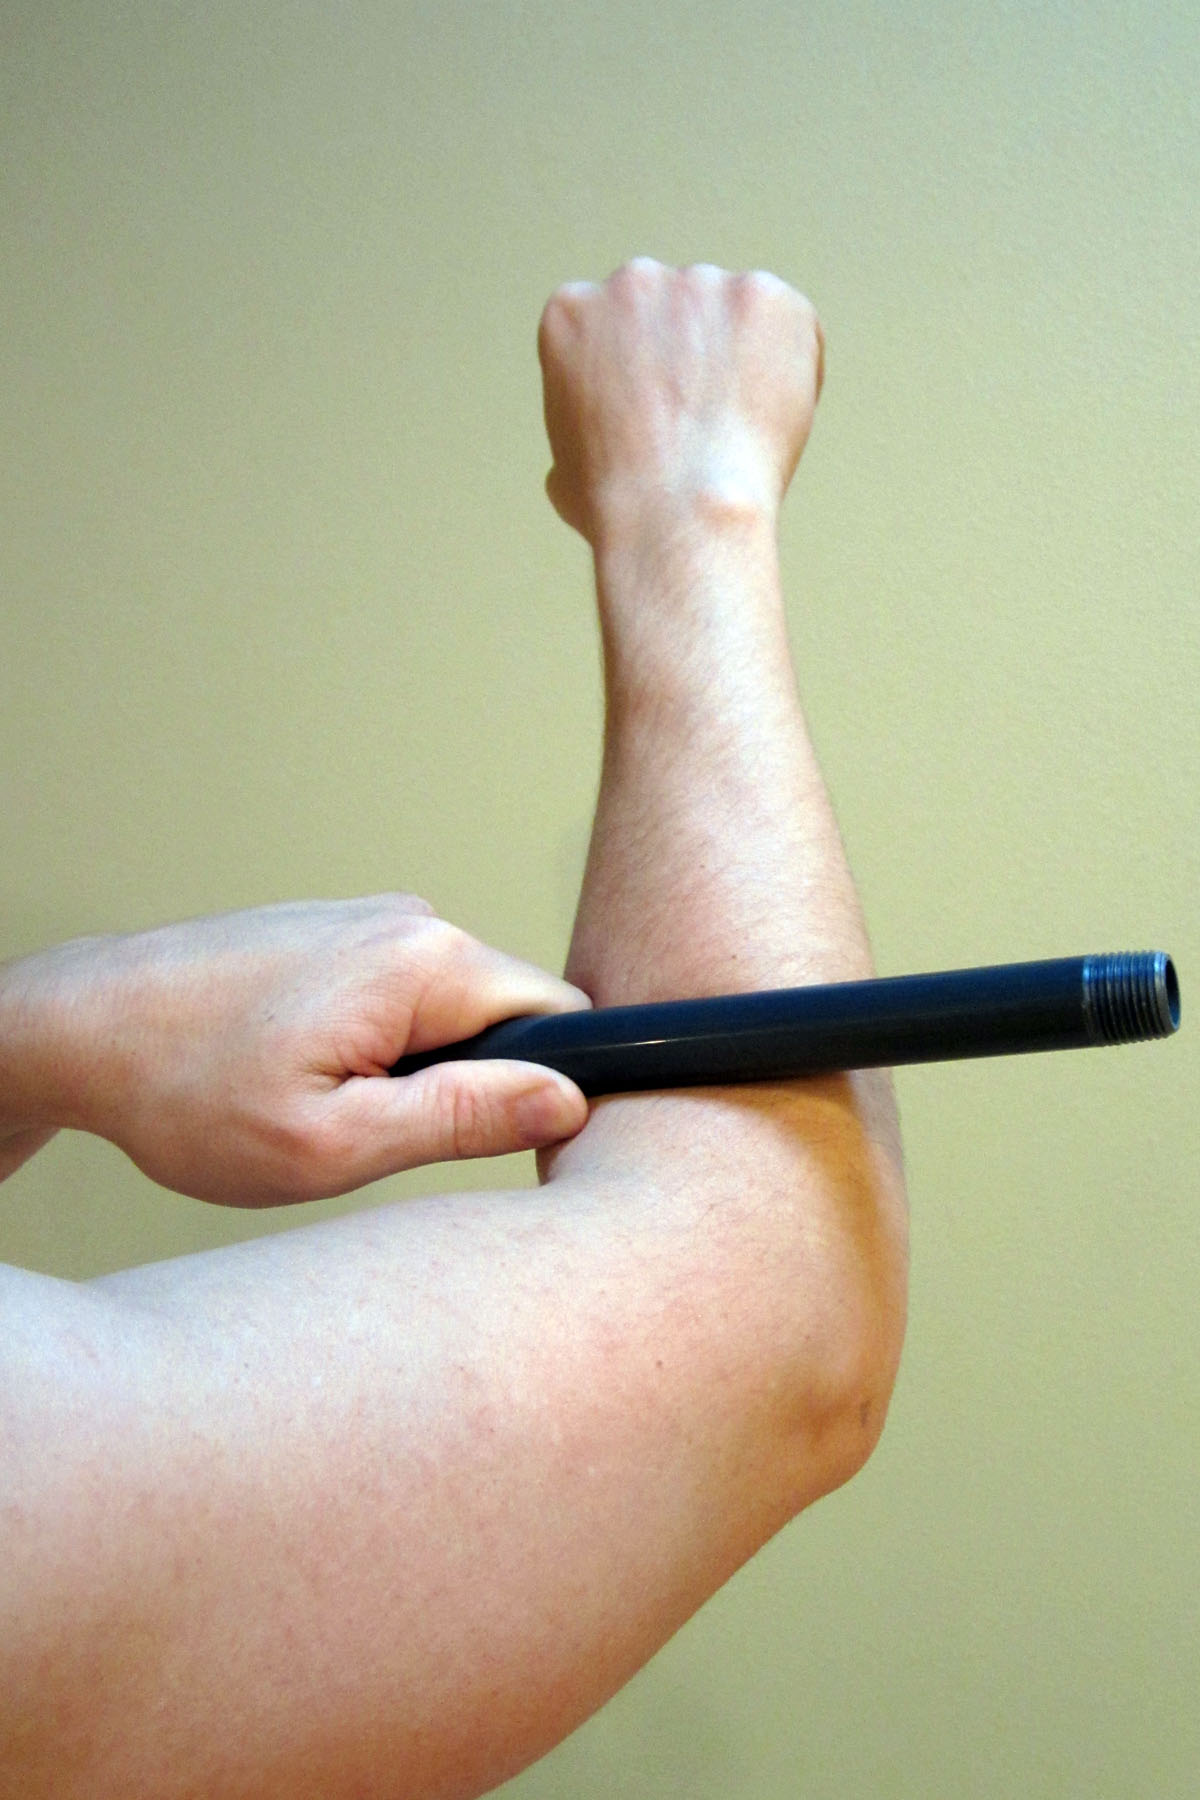
Restrictions in mobility typically don’t just occur in the fingers and wrist, but also up the arm and into the thoracic and cervical spine.  I like to use items, such a PVC pipe, that you might already have at home.  This works great for forearm mobilization.  You could also use a golf ball.  You can use one hand to press or rub the PVC pipe over sore or tender areas.  The amount of pressure shouldn’t be painful.  Avoid pressing on especially boney areas.

Poor mobility elsewhere in the kinetic chain can and will affect hand and wrist symptoms.  Work on upper body mobility by focusing on shoulder and thoracic mobility.  You can automatically download my FREE resource for shoulder and thoracic mobility, My Top 8 Stretches to Eliminate Neck, Upper Back, and Shoulder Pain, when you subscribe to my e-mail list.

Be proactive.

Once you start to feel pain, be aggressive with your management and self-treatment.  Implement these recommended exercises, stretches, and mobilizations quickly so you can stop the pain from progressing.  It’s always easier to intervene early.  Take your rehabilitation seriously and perform the exercises diligently while you work to eliminate risk factors that may be affecting the condition.

Contact your Physical Therapist (PT).

If the pain persists, seek additional help.  Don’t let the pain linger.  The longer it’s left untreated, the more potential for harm and damage (which potentially could lead to a longer recovery).  The American Physical Therapy Association (APTA) is an excellent resource for learning more about physical therapy as well as locating a physical therapist in your area.

Thanks for the question, Jared!  Carpal Tunnel Syndrome (CTS) can be debilitating by limiting your ability to exercise, work, and perform daily tasks.  Be proactive in your care and management.  Most importantly, don’t let the pain and symptoms linger.  The longer you have the symptoms, the harder they can be to eliminate and recuperate from.

Have you ever dealt with Carpal Tunnel Syndrome (CTS) pain?  Which treatments have you found to be the most effective?  Additional discussion can help others to manage their pain.  Please leave your comments below. 

If you have a question that you would like featured in an upcoming blog post, please comment below or submit your question to contact@thePhysicalTherapyAdvisor.com.  Be sure to join our growing community on Facebook by liking The Physical Therapy Advisor!

Hip Flexor Pain and Pain in the Front of the Hip

Pain in the hip flexor or front of the hip/leg can be associated with several possible causes.  When you experience pain in the front of the hip, and it doesn’t have an obvious mechanism of injury (such as tripping in a hole when running), then it’s almost always a repetitive motion injury or related to poor posture and/or biomechanics.

The location of pain in the hip flexor region can range from mid-thigh to the groin area to the lower stomach (from the belly button to the PSIS, which is the posterior superior iliac spine) or the front of the pelvic bone just up and lateral to the groin area where the primary hip flexor (psoas) originates.

Common potential reasons for pain in the front of the hip include:

  1. Femoral Stress Fracture
  2. Hernia
  3. Femoral Acetabular Impingement (FAI)
  4. Groin Muscle Strain
  5. Low Back Pain (LBP)
  6. Hip Flexor Strain

I will cover each one of these in more detail.

There are many common reasons to develop pain in or around the hip flexors.  Often the cause for the pain is nearly identical (overuse).  It’s important to get the proper diagnosis to insure that you’re treating the right structures.  Continue Reading

Can Foam Rolling Really Help Prevent Injury?

From a personal and professional point of view, yes!  I believe foam rolling works and can be a useful tool to reduce the risk of injury.  From a research point of view, there are studies that confirm that foam rolling can reduce muscle soreness after exercise and improve range of motion (ROM).  It may also improve recovery times by affecting how quickly a person recovers and performs one to three days post exercise session.

The actual mechanism of how and why foam rolling works is still under debate.  Foam rolling is touted as being a self-myofascial release technique.  Whether or not the fascia is actually being conclusively changed is still under investigation.  What we do know is that the foam roller has positive effects on pain modulation, nervous system control over ROM, and affects blood flowFoam rolling is generally not advised for anyone on blood thinning medications or with blood clotting disorders.

Foam rolling is one way to potentially improve fascial mobility.  Fascia is a form of connective tissue that is integrated throughout the body like a spider’s web and is in and around all of the tissues.  Injury, chronic poor posture, training and exercise, nutrition, health status, and even age will affect the health and mobility of the fascia.  When fascia becomes restricted, adhesions form which cause soreness, restricted movement, gait change, and potential injury or illness.

Although research has not conclusively proven exactly how foam rolling affects the fascial system, it appears to have a positive effect by decreasing muscle and joint pain while increasing circulation and improving mobility, balance, and gait mechanics.

Range of Motion

Foam rolling likely has a positive effect on arterial stiffness and can improve arterial and vascular function while also positively affecting joint range of motion (ROM).  The change in arterial and vascular function may in part be why foam rolling (after training) seems to have a positive effect in reducing muscle soreness.

Foam rolling also appears to have a beneficial effect on ROM, and more importantly, it can help improve ROM without negatively affecting performance.  In contrast, static stretching has been shown to impede performance.

Aids in Recovery

Foam rolling may promote more blood flow to the area, which allows the body to eliminate waste more efficiently while providing much needed nutrients to aid in recovery.  Improved recovery is important if you plan to participate in multiple events over multiple days such as a relay or weekend tournament.  It may also allow for more intense and frequent training while reducing injury.

It may aid training during certain cycles when the intensity or volume may be higher or during an overreaching phase of training.  Overreaching is typically a very short and deliberate phase in your training when you have a spike in training volume for a week or two followed by a return to baseline or below which can lead to improvements in performance.  Care must be taken though because overreaching can easily turn into overtraining.

How to choose a foam roller:

Choosing the right size and density of foam roller is important.  Research thus far concludes that a firmer high density foam roller has a more positive treatment effect than a softer version.

Depending on how you personally utilize the roller, the preferred length may vary.  This is also true in regards to the texture on the foam roller.  There are many styles of foam rollers to choose from which vary in texture and size.  Each size has a slightly different purpose and use.

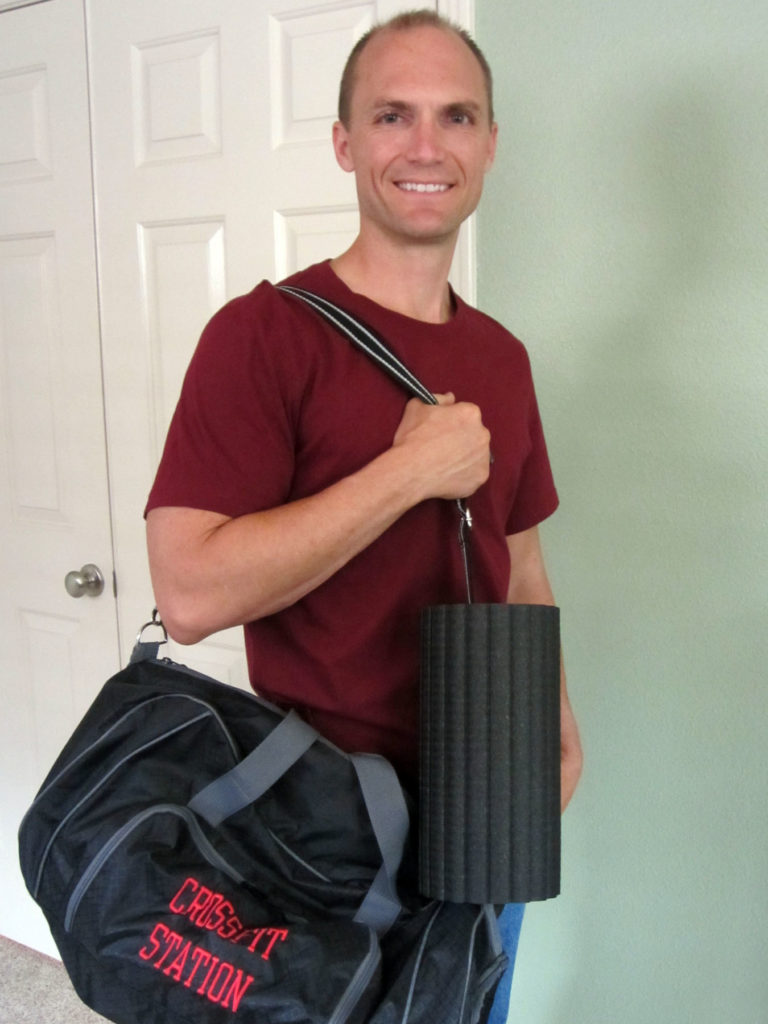
The BLACKROLL® FLOW is one of my favorite compact textured foam rollers.  It’s the perfect size for travel or home use, and I can use it for nearly all of my favorite stretches and mobilizations.  In addition, the texture is just the right amount without being too knobby or aggressive.  I like how easily I can attach it to my work out bag for on the go use as well.

How to use the foam roller:

Foam rolling has many practical uses.  It works best when used over larger muscle groups such as the legs.  It’s my go to tool for addressing mobility issues throughout the thoracic spine.  Individuals taking blood thinning medications or with blood clotting disorders should consult his/her physician prior to using a foam roller for mobilization.

  • I typically recommend one to three minutes of body weight rolling (if it is tolerated) per extremity, and the same for the thoracic, low back, and buttock area.
  • A good rule of thumb is to roll out an area that is tender and sore, or recently worked, until it no longer feels tight and sore.
  • Again approximately one to three minutes per area although this may vary based on your size. Do not roll too quickly.  Be careful to not over do.  One to three minutes per area is typically optimal.
  • In cases of painful areas and injured areas, it’s often more effective to roll out the adjacent and associated areas near the injury area while avoiding the most painful spots.
  • Rather than constantly working directly on the area that causes pain, slowly foam roll your way away from the pain center to the connecting muscles.
  • Increased time will be needed the more developed your muscles are.
  • Be sure to roll the tissues in different positions and postures especially in more lengthened positions.

For more information on the use of a foam roller, please refer to Does Foam Rolling Help or Hurt Performance?

What has been your experience with using the foam roller?  Is it worth the effort?  Please share your comments or questions!

Join our growing community on Facebook by liking The Physical Therapy Advisor!  If you have a question that you would like featured in an upcoming blog post, please e-mail contact@thephysicaltherapyadvisor.com.

How to Use the Clamshell Hip Exercise to Treat Knee Pain

Knee pain is the most common running related injury.  There are many different causes of knee pain including: Patellar Femoral Pain Syndrome (PFPS); Iliotibial Band pain (IT Band); Patellar Tendinitis; and meniscus injuries.

The root cause of many of the most common knee related issues is hip weakness.  The hip abductors and hip external (lateral) rotators are very important for knee control and stability.  When weakness is present in these groups of muscles, pain is often felt down the kinetic chain (particularly, in the knee).

One of the best ways to treat many common running aches and pains is to focus on strengthening these muscles which include the gluteus medius, the tensor fascia latae, and the other deep hip rotators.

In this video, I demonstrate how to perform the clamshell exercise.  It’s an excellent non-weight bearing exercise to work on hip rotator strength which will directly affect knee stability.  In the video, I use a red exercise band.  As you progress, you could transition to a thicker band to increase the resistance and difficulty of the exercise.

Looking for more comprehensive information on how to self-treat and prevent the most common running related injuries?  I have teamed up with Angie Spencer (RN and Certified Running Coach) and Trevor Spencer (co-host of the Marathon Training Academy Podcast) to give you the tools to become a Resilient Runner.

In the Resilient Runner program, we explain injury prevention strategies to keep you running.  We provide detailed videos and rehabilitation guides on how to effectively SELF-TREAT each problem area of the body including:

  • Lower Back Pain and Piriformis
  • Hip: Hip Bursitis and Hip Flexor Pain
  • Upper Leg: Iliotibial Band and Hamstring Injury
  • Knee Pain: Patellar Femoral Pain Syndrome (Runner’s Knee); Patellar Tendinitis; and Meniscus Injury
  • Lower Leg and Foot: Achilles Tendinitis; Plantar Fasciitis; Posterior Tibial Tendon Dysfunction; Shin Splints; and Stress Fractures

The Resilient Runner program is designed to help YOU meet YOUR training goals by insuring you have the tools to avoid injury, recover quickly, and train at a peak level.

It’s a virtual library of self-treatment protocols including downloadable podcasts, videos, and .pdf files of rehabilitation guides.  It also includes a 320 page eBook, The Resilient Runner, Prevention and Self-Treatment Guide to Common Running Related Injuries.


Not all of us are born bullet proof, but we can all learn how to be more resilient!

I WANT TO BE RESILIENT!